
Lesson 7 of 10 · 9 min read
Add your first offer in OfferDaemon
Create a fixed CPA offer, pass the click ID to its destination, set rates and visibility, then prepare one publisher tracking link.
Reviewed 22 September 2026 · MyCPANetwork team
By the end of this lesson
Have one configured offer, one approved test publisher and a generated tracking link ready for an end-to-end test.
Before you start
Complete lesson 6 so your network identity, registration policy and domains are ready. Bring the advertiser’s approved landing URL, qualifying action, traffic rules, revenue rate and currency, plus the agreed publisher payout. This lesson configures one offer and one publisher link.
The screenshots were captured in Demo Network, in light mode, on 22 September 2026. The offer, names and rates are teaching examples, not earnings or a real advertiser agreement. Click a screenshot to enlarge it. Use your own network's values and generated links; do not copy demo IDs.
For practice, use a company and partner approved for testing, with no real purchases or payable traffic.
Step 1: Create one straightforward offer
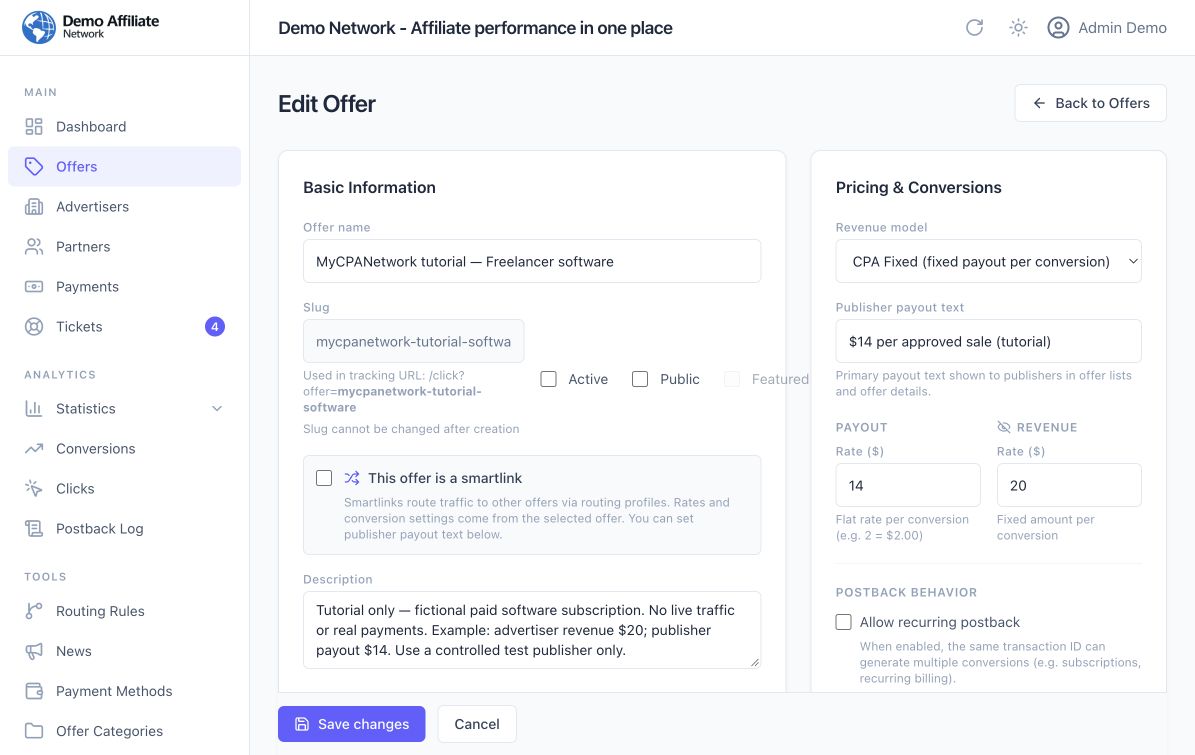
Open Offers → New Offer. We will use a fictional paid software subscription, with a $20 advertiser rate and a $14 publisher payout.
- Enter a recognizable Offer name. Our example is
MyCPANetwork tutorial — Freelancer software. - Set a stable Slug, such as
mycpanetwork-tutorial-software. This appears in tracking links and becomes read-only after creation. - Leave This offer is a smartlink off. This example goes to one destination.
- Write the qualifying action, permitted traffic and restrictions in Description. Mark a practice offer clearly as tutorial-only.
- Leave Public off while preparing this controlled example. Active must be on when you run the tracking test; an unfinished offer can remain inactive until then.
Public is a catalog setting, not a publisher allowlist. Turning it off hides the offer from ordinary partner discovery. It does not by itself guarantee that only one publisher can send traffic. Share your test link deliberately and keep the offer inactive whenever it should not receive traffic.
Step 2: Pass the click ID to the destination
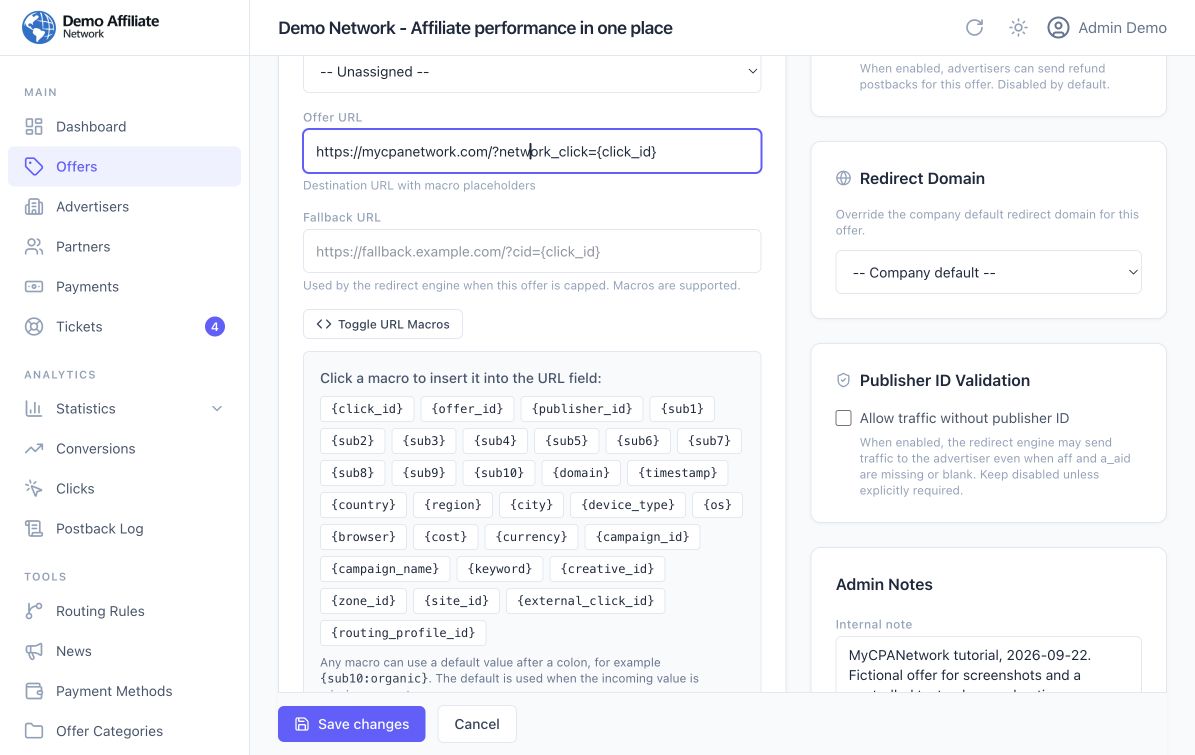
The Offer URL is where the visitor goes after OfferDaemon records the click. A click ID is the reference that lets the advertiser report which visit produced a conversion.
- Paste the advertiser’s approved destination into Offer URL.
- Add the advertiser’s agreed parameter name, followed by
{click_id}. Use Toggle URL Macros to find the supported tokens; the {click_id} button inserts that token. - Check that you have not inserted it twice and that the URL still has the correct
?and&separators.
For our isolated demonstration we used:
https://mycpanetwork.com/?network_click={click_id}
This sends the test visitor back to this educational website. It is not an advertiser integration. In a real campaign, replace the whole destination with the advertiser’s approved URL, and use the parameter name they actually store. For example, network_click is our choice here, not a universal requirement.
Step 3: Set the rates and approval behavior
In Pricing & Conversions:
- Select CPA Fixed (fixed payout per conversion) under Revenue model.
- Under PAYOUT, enter
14in Rate ($). - Under REVENUE, enter
20in the other Rate ($) field. The live form labels both fields “Rate ($)”; the section above each field tells you which is which. - Set Publisher payout text, for example
$14 per approved sale (tutorial). This describes the payout to the publisher; it does not replace the numeric rate. - Leave Auto-approve conversions off for this manual-review example. A successful test should therefore create a pending conversion.
- Leave Allow recurring postback off for this one-time event. Leave Allow refunds off unless your agreed integration requires them.
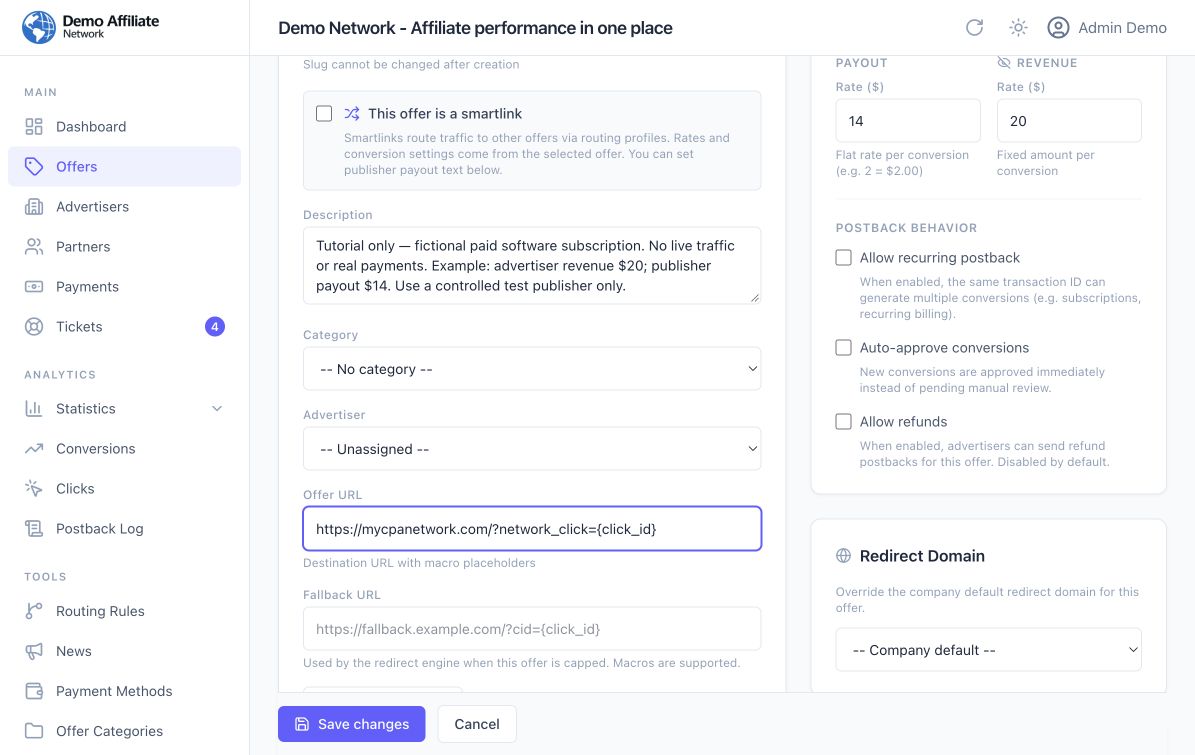
Keep Redirect Domain on Company default for this example. Leave Allow traffic without publisher ID off so your test uses an identified publisher.
Step 4: Finish the required fields and save
Check the rest of the form before clicking Create Offer:
- Complete any fields marked
*. In this demo, KPI Type is Sale, and Traffic Requirements says the offer accepts tutorial test traffic only. Your company’s custom fields may differ. - If GEO Targeting or Offer Caps is enabled, enter the restrictions you actually agreed. Empty allowed countries means no country restriction; a written country restriction is not automatically a configured GEO rule.
- Select the relevant Advertiser if you maintain advertiser records. This organizes the offer internally; it does not create an advertiser login. Our fictional example is unassigned.
- Put private test notes in Internal note, not in the publisher-facing description.
Click Create Offer. You should return to Offers and see Offer saved successfully. Search by your slug and check the model, rate and activity status. If validation keeps you on the form, fix the highlighted field before continuing.
Step 5: Prepare your test publisher
For an existing partner, open Partners, search for the partner and check that the role is Publisher and the status is Approved. Our screenshots use the existing demonstration account Atlas Content.
If you need to invite a new test publisher to your own network:
- Open Partners → Invite Publisher.
- Enter Full Name and an Email Address controlled by you or a partner who has agreed to the test.
- Check the address before choosing Send Invitation. This sends a real email and creates a pre-approved account.
- The recipient follows the invitation to set their password, then signs in. Confirm they can access the intended network before live use.
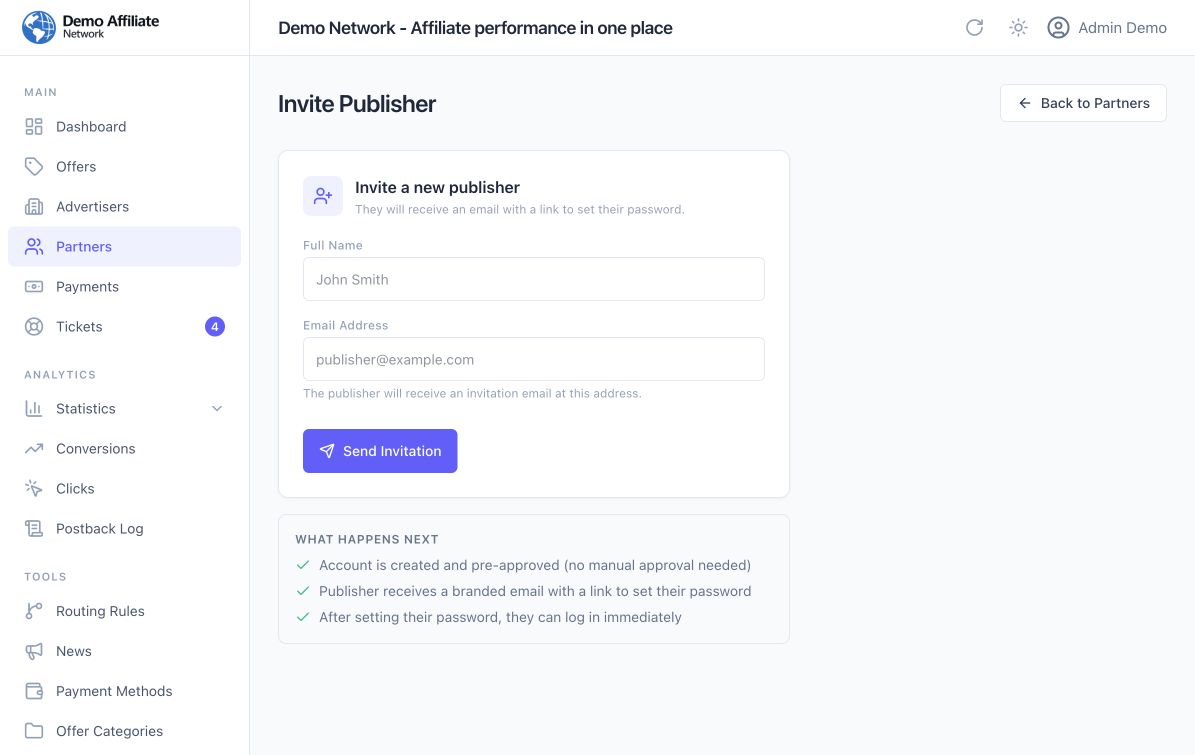
Do not confuse an admin-generated link with proof that a publisher has completed onboarding. Check delivery and login separately when you use a new invitation.
Step 6: Generate the publisher’s tracking link
- In Partners, find the intended publisher and click the chain-link action, Generate Tracking Link. From the partner detail screen, the equivalent button is Generate Link.
- Check the Partner Details card. The name, role and status should belong to your test publisher.
- In the Offer search box, type at least two characters of your offer name or slug, then select the result. Typing alone does not select an offer.
- Check Base URL (auto-generated). Let the application choose the domain and identifiers.
- In the parameter row, choose sub1 — Sub ID 1 and enter a recognizable label such as
pilot-test-20260922. If no row is present, use Add Parameter. - The Tracking Link updates automatically. Click Copy URL and save it in your test notes.
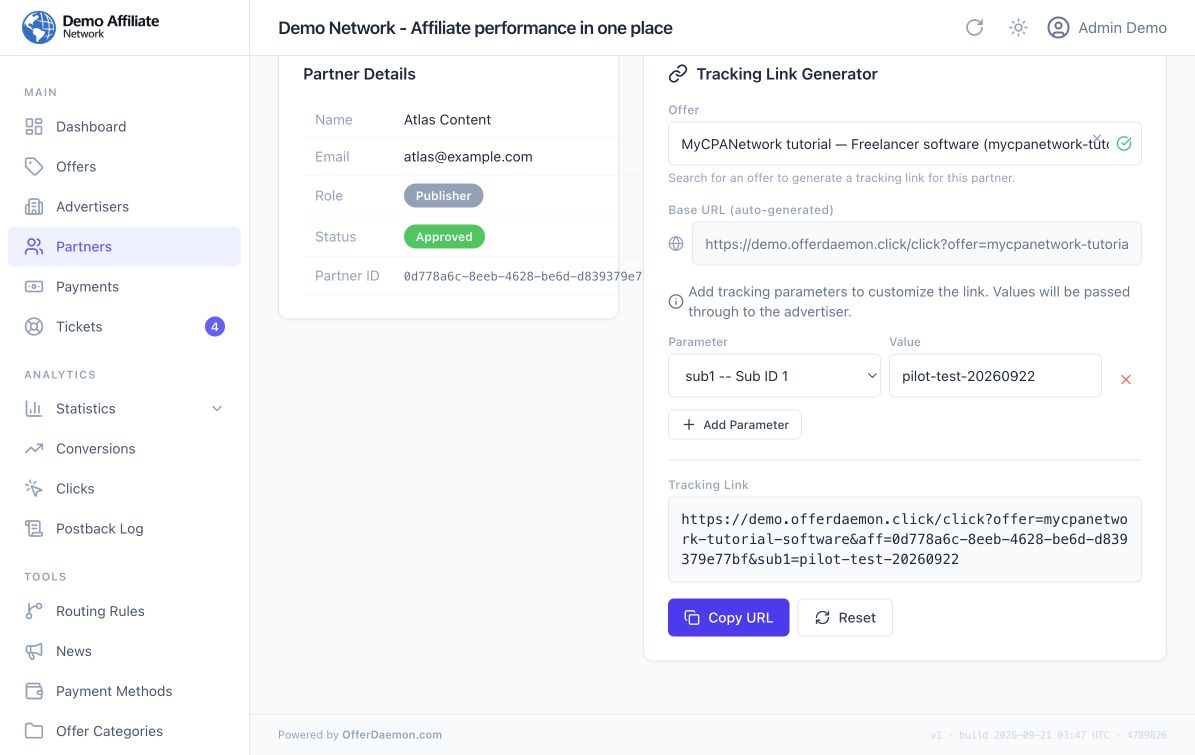
You should now have: one saved offer, one approved test publisher and that publisher’s generated URL. These are different from the offer destination: publishers share the tracking link, which records the click and then redirects to the Offer URL.
Do not launch yet. A generated link can exist for an inactive offer, and a saved configuration is not evidence of a working conversion. Lesson 8 checks the complete path.
Your checklist
Tick each point when you feel ready.
The numeric publisher payout and advertiser revenue rates must match the written agreement and the offer's displayed terms.
The click ID macro sends a unique identifier to the destination so a later conversion can be matched to the original click.
Public controls catalog discovery, while Active and conversion approval settings control other parts of the pilot workflow.
The partner's role and approval status must be checked before sharing a publisher-specific tracking link.
The publisher link and your notes provide a starting point for checking one click through to a conversion.
0 of 5 checked
Your progress stays in this browser.Next step
Run the click-to-conversion test before accepting live traffic.
Want a hand with this step?
Get practical setup help from the team behind OfferDaemon.